Plaid
此页面包含Plaid的设置指南和参考信息。
前提条件
- Plaid API密钥(API key)
- 客户端ID(Client ID)
- 访问令牌(Access token)
功能
| 功能 | 是否支持 |
|---|---|
| 完全刷新复制 | 支持 |
| SSL链接 | 支持 |
| 命名空间 | 不支持 |
设置指南
第一步:获取Plaid设置相关信息
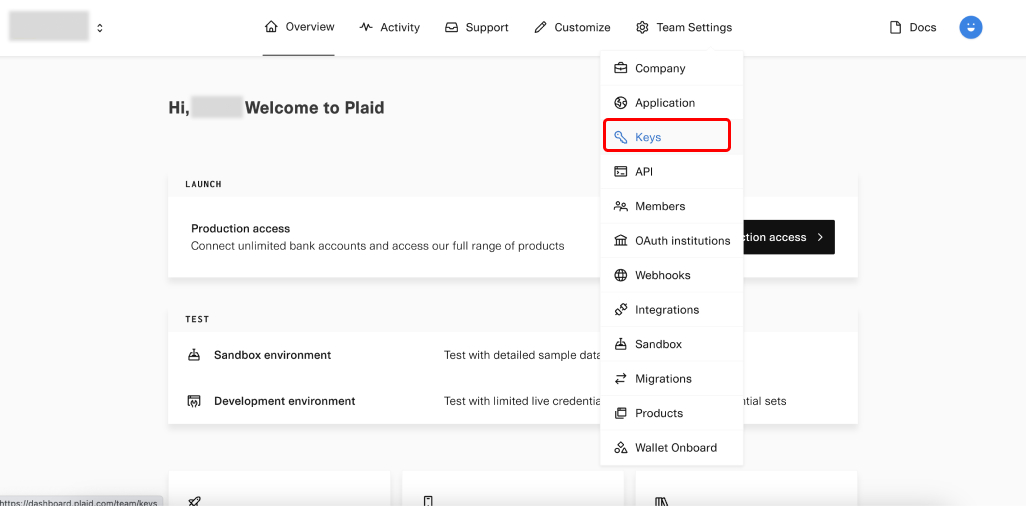
访问您的Plaid dashboard: 点击Team Settings下拉列表中的Keys。

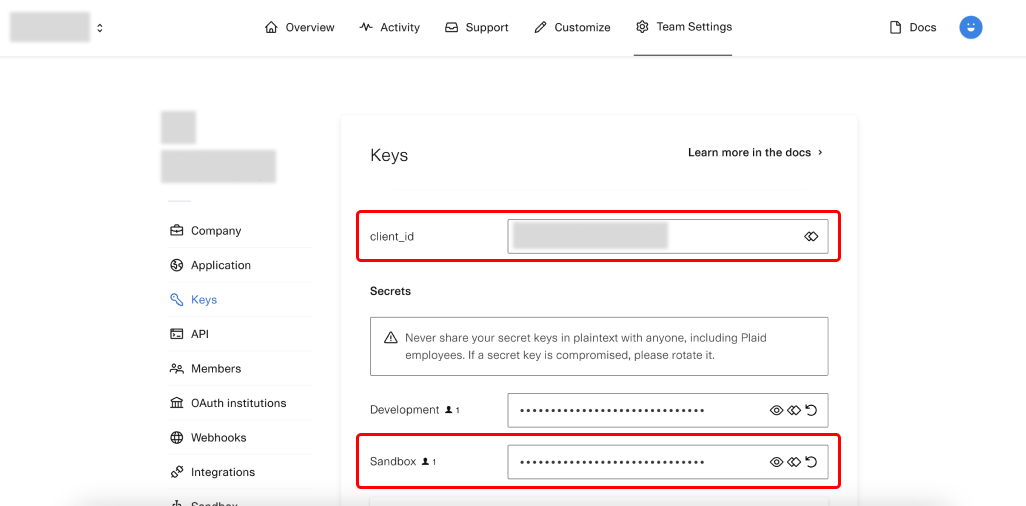
获取客户端ID和API密钥: 在Keys页面上,复制您的client_id和Sandbox secret。

创建访问令牌: 首先您需要创建一个公共令牌密钥,然后您可以使用它创建访问令牌。
- 创建公共令牌密钥: 根据Plaid文档中的描述调用API
curl --location --request POST 'https://sandbox.plaid.com/sandbox/public_token/create' \
  --header 'Content-Type: application/json;charset=UTF-16' \
  --data-raw '{
      "client_id": "<your-client-id>",
      "secret": "<your-sandbox-api-key>",
      "institution_id": "ins_43",
      "initial_products": ["auth", "transactions"]
  }'
- 将公共令牌密钥交换为访问令牌: 根据Plaid文档中的描述调用API。此请求中使用的公共令牌密钥是在先前请求的响应中返回的令牌。
curl --location --request POST 'https://sandbox.plaid.com/item/public_token/exchange' \
  --header 'Content-Type: application/json;charset=UTF-16' \
  --data-raw '{
      "client_id": "<your-client-id>",
      "secret": "<your-sandbox-api-key>",
      "public_token": "<public-token-returned-by-previous-request>"
  }'
- 您已成功获取了所有在Daspire设置Plaid所需的资料。
第二步:在Daspire中设置数据源
在数据源设置页面上,从数据源类型下拉列表中选择Plaid。
输入数据源名称。
输入Plaid API密钥(API key)。
输入Plaid客户端ID(Client ID)。
从sandbox,development或production中选择您需要同步数据的Plaid环境。
输入Plaid访问令牌(Access Token)。
点击保存并测试。
支持的数据流
此数据源能够同步以下数据流:
性能考虑
在正常使用情况下,Plaid接口应该不会遇到Stripe API的限制。如果您发现任何未自动重试成功的速率限制问题,请联系我们。
故障排除
单次可同步的最大表数为6千张。如果由于达到最大表数而无法获取数据架构,我们建议您调整数据源设置。