Google Analytics 4 (GA4)
This page contains the setup guide and reference information for Google Analytics 4 (GA4).
Prerequisites
- A Google Analytics account with access to the GA4 property you want to sync
- Google Service Account JSON Key
- Google Analytics Property ID
Features
| Feature | Supported? |
|---|---|
| Full Refresh Sync | Yes |
| Incremental Sync | Yes |
| Namespaces | No |
Setup guide
Step 1: Create a GA4 Service Account for authentication
Sign in to the Google Account you are using for GA as an admin.
Go to the Service Accounts page in the Google Developers console.
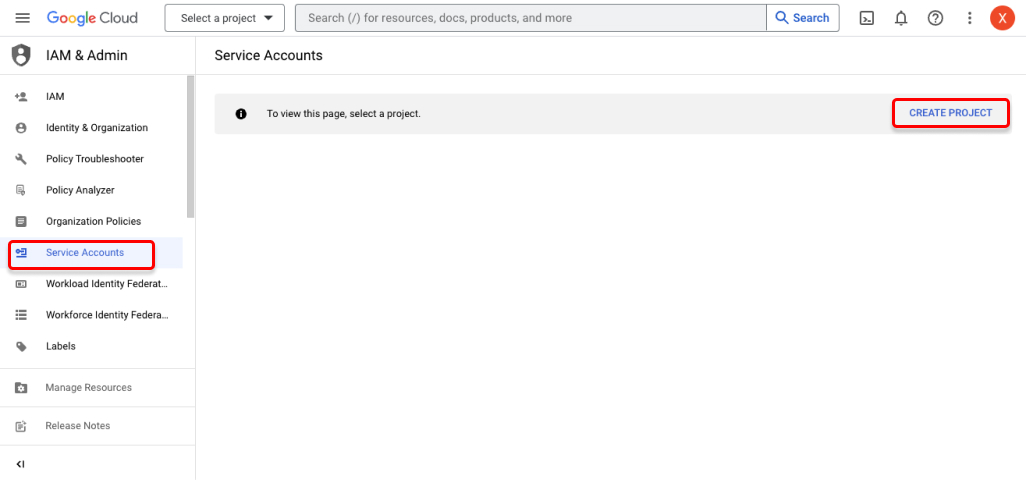
Select the project you want to use (or create a new one).
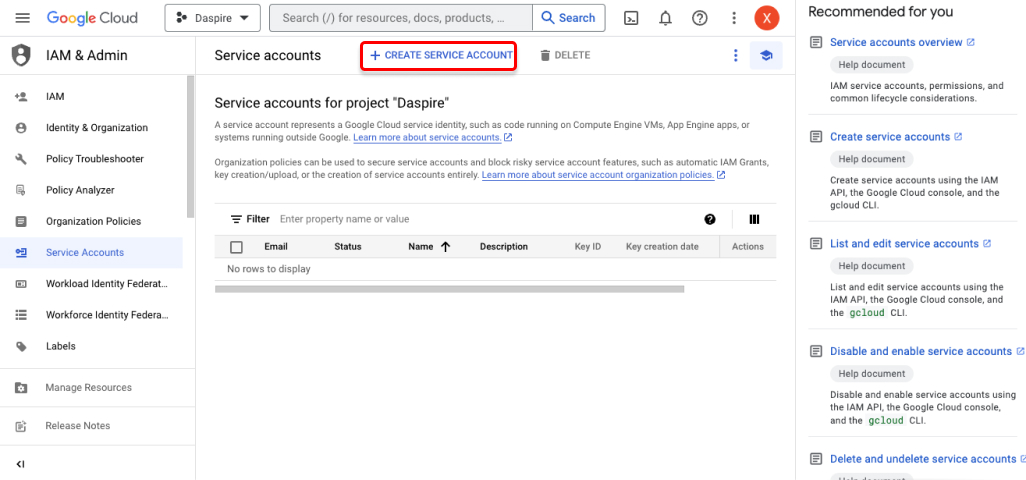
Click + Create Service Account at the top of the page.
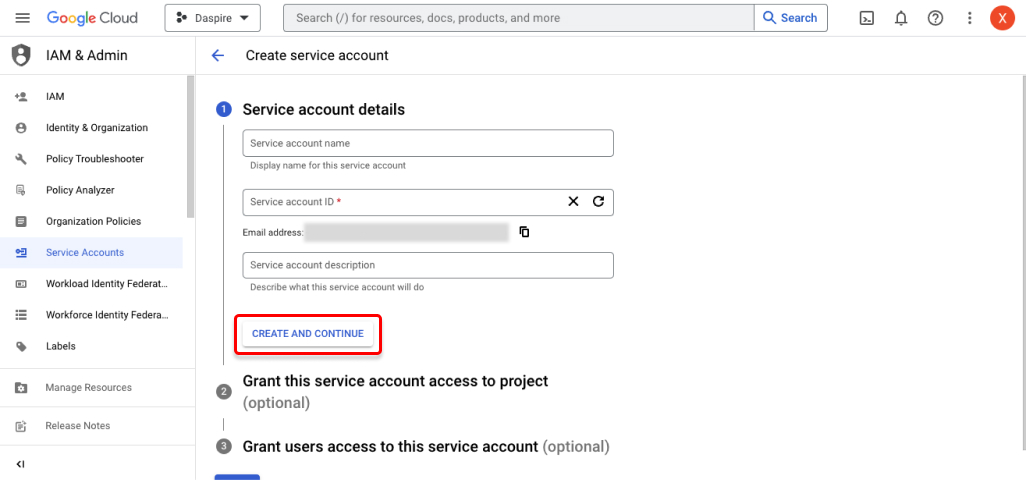
Enter a name for the service account, and click Create and Continue.
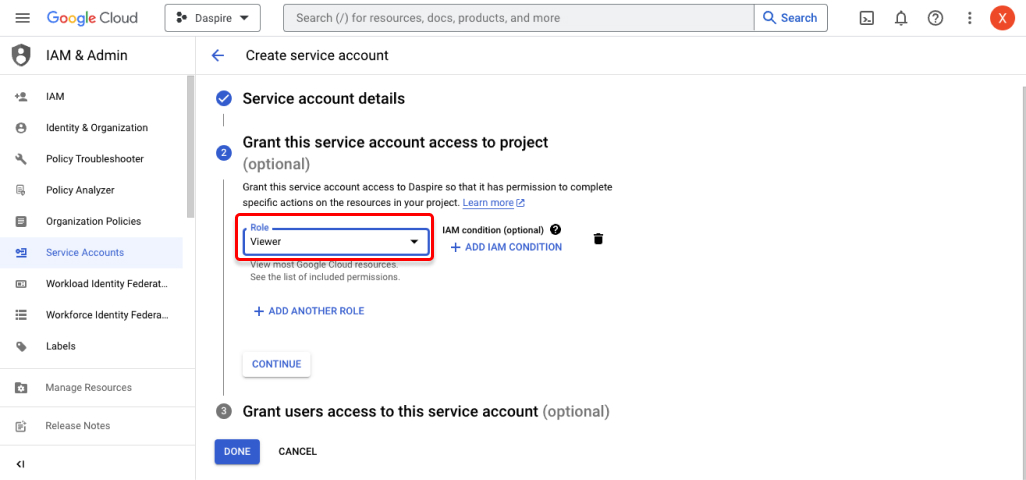
Choose the role for the service account. We recommend the Viewer role (Read & Analyze permissions). Click Continue. And then click Done.
Select your new service account from the list, and open the Keys tab. Click Keys > Add Key.
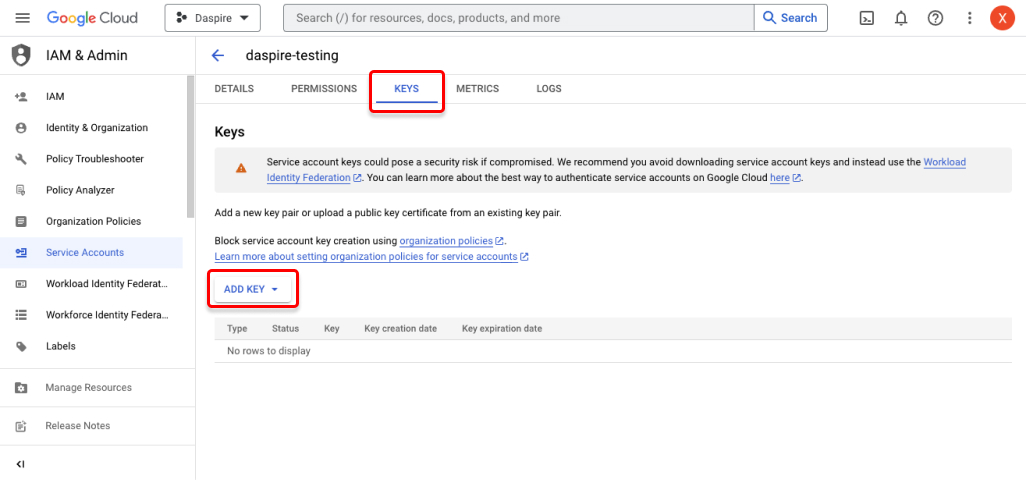
Select JSON as the Key type. Then click Create. This will generate and download the JSON key file that you'll use for authentication.
Step 2: Enable the Google Analytics APIs
Go to the Google Analytics Reporting API dashboard. Make sure you have selected the associated project for your service account, and Enable the API. You can also set quotas and check usage.
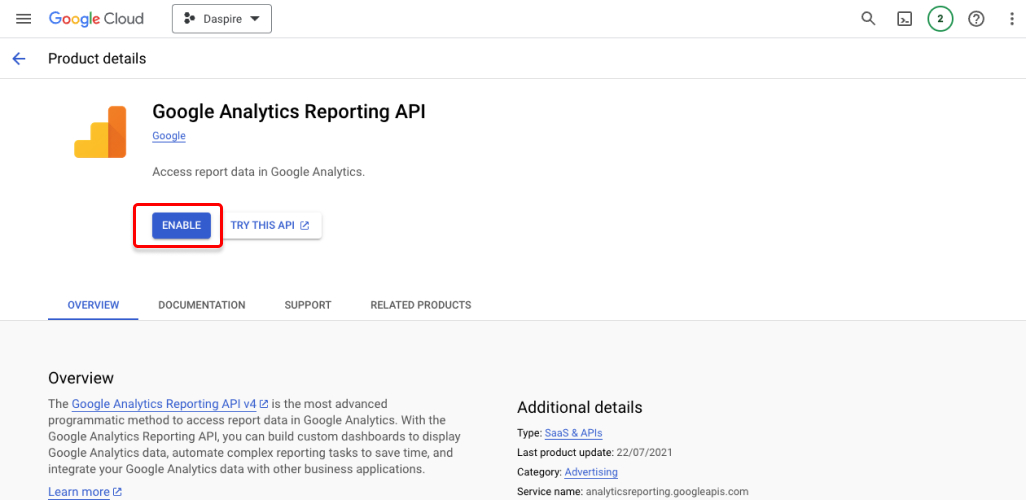
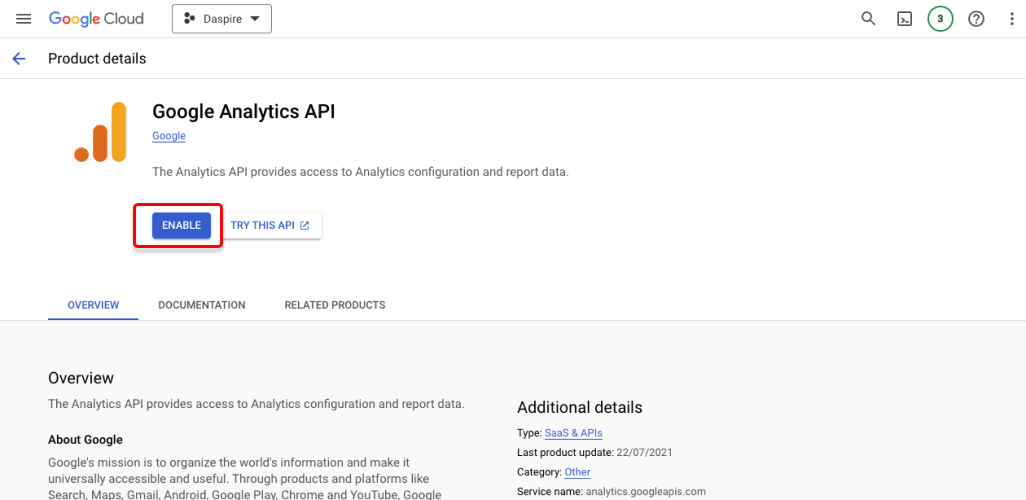
Go to the Google Analytics API dashboard. Make sure you have selected the associated project for your service account, and Enable the API.
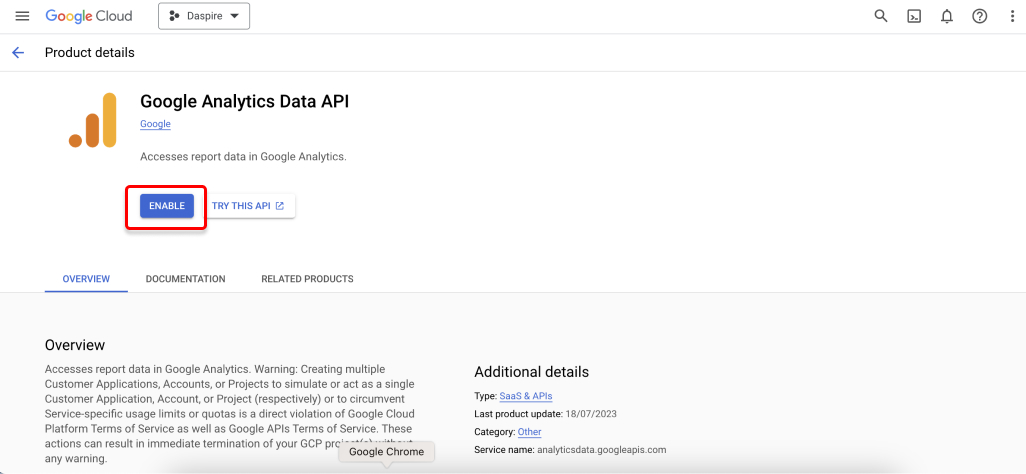
Go to the Google Analytics Data API dashboard. Make sure you have selected the associated project for your service account, and Enable the API.
Step 3: Obtain your GA4 property id
Sign in to the Google Analytics account as an admin.
On the left sidebar, click Admin.
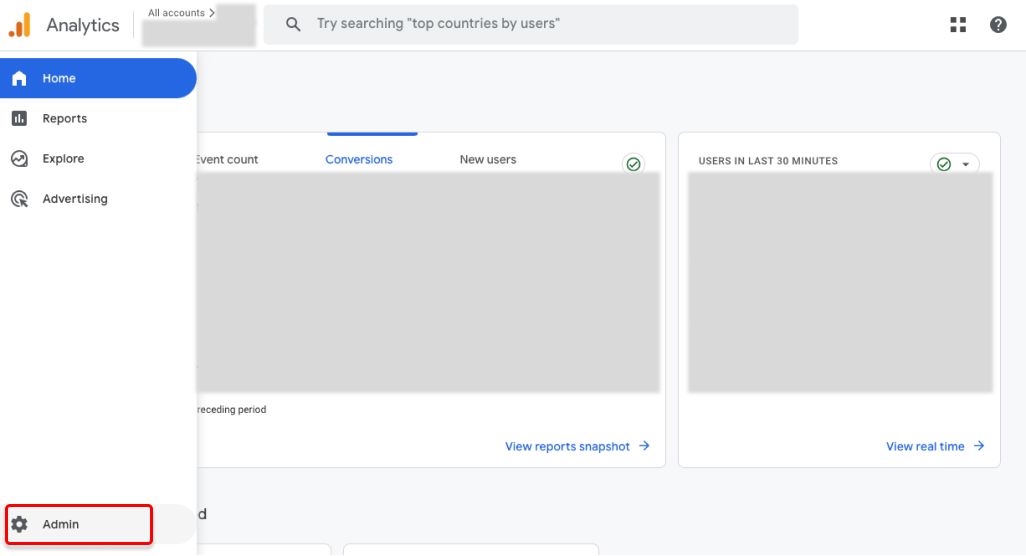
Click Property.
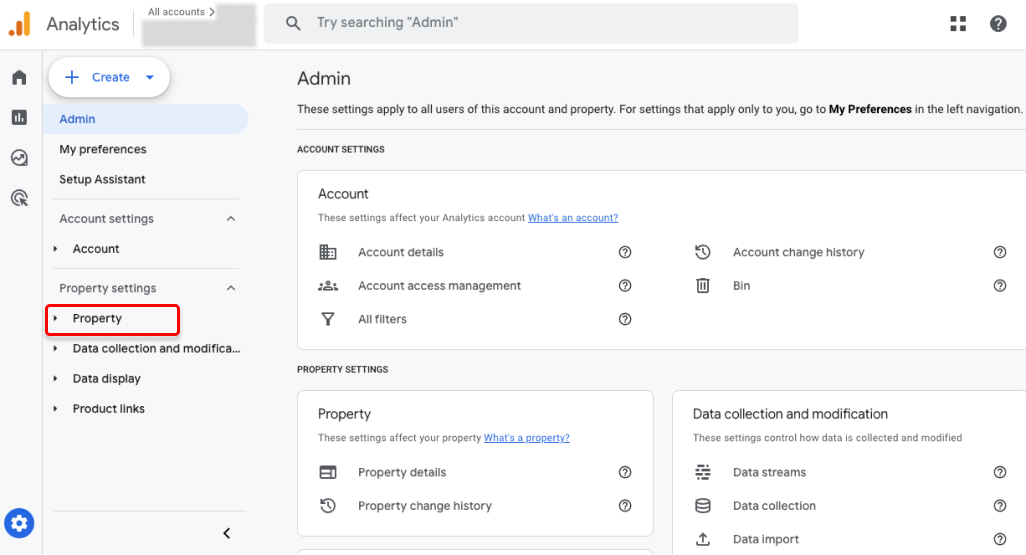
Click Property details and you will find your Property ID on the top right corner. This ID should be a numeric value, such as
123456789. Copy it for later use.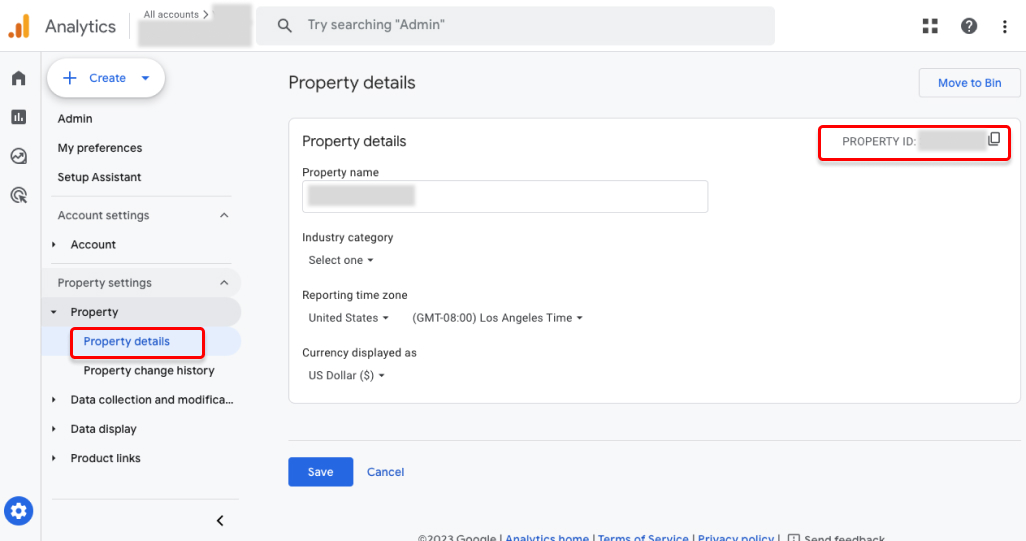
Step 4: Grant Service Account GA4 property access
Following Step 3, inside the Admin area of your GA4 account, click Account Access Management.
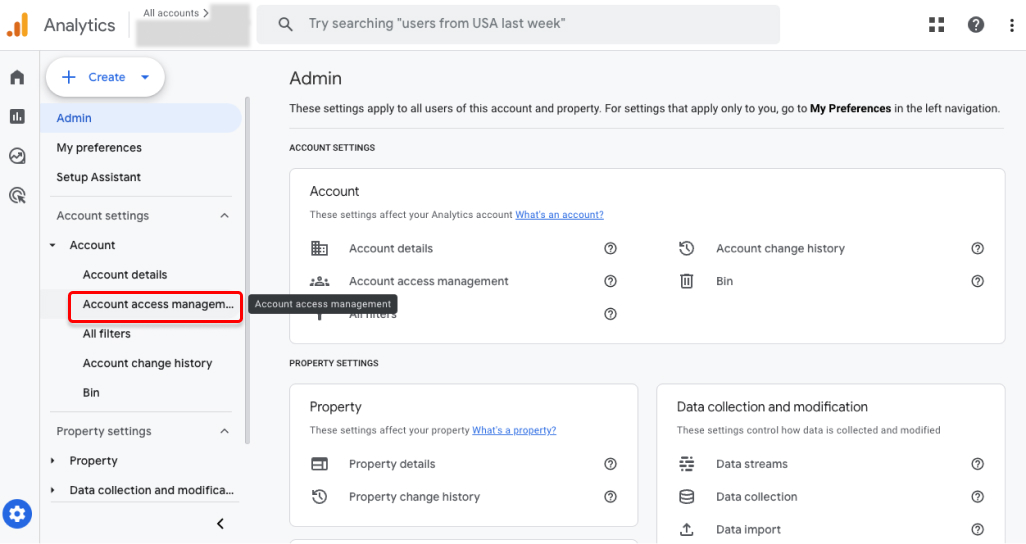
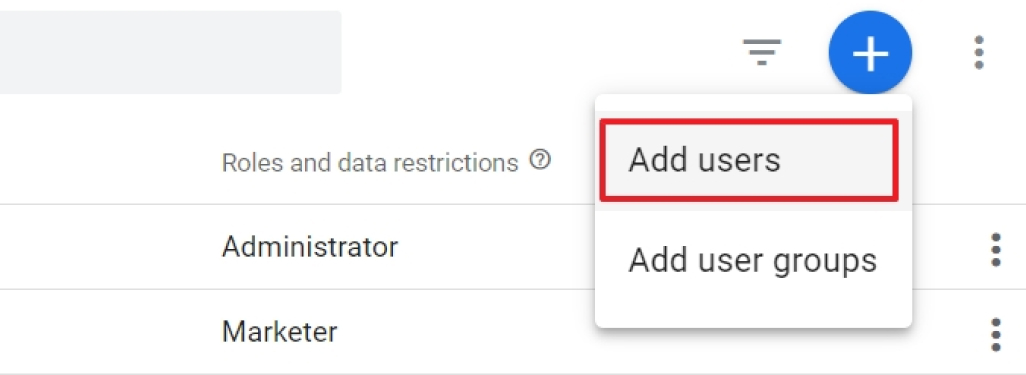
Click the blue + button in the right top corner of your screen. And click Add Users.
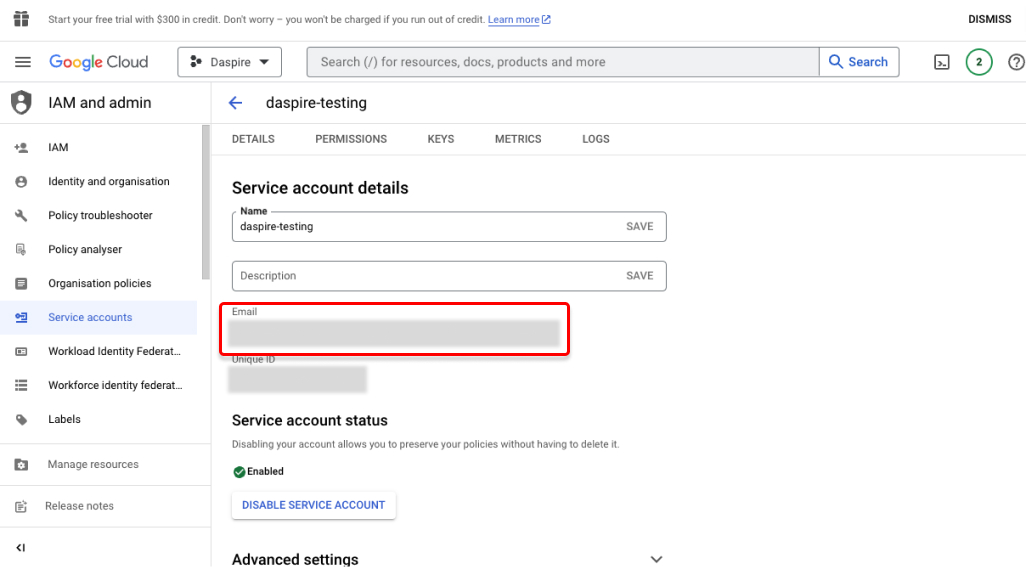
Enter the email address of your Service Account user you created in Step 1. You can find the email listed in Service accounts in your Google Cloud Platform.
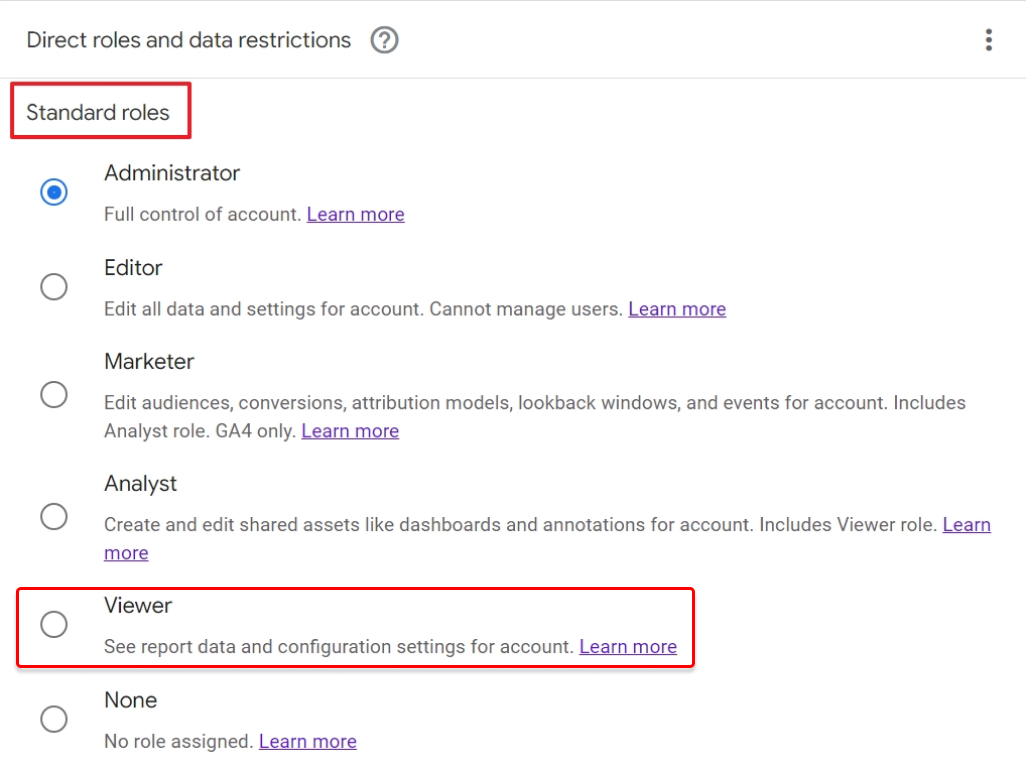
Assign a role to the Service Account user. Daspire only needs the Viewer role. And click Add.
Step 5: Set up GA4 in Daspire
Select Google Analytics 4 (GA4) from the Source list.
Enter a Source Name.
Select Service Account Key Authenication dropdown list and enter Service Account JSON Key you obtained from Step 1.
Enter the GA4 Property ID you obtained from Step 3.
(Optional) In the Start Date field, enter a date in the format
YYYY-MM-DD. All data added from this date onward will be replicated. Note that this setting is not applied to custom Cohort reports.Note: If the start date is not provided, the default value will be used, which is two years from the initial sync.
(Optional) In the Custom Reports field, you may optionally provide a JSON array describing any custom reports you want to sync from GA4. See the Custom Reports section below for more information on formulating these reports.
(Optional) In the Data Request Interval (Days) field, you can specify the interval in days (ranging from 1 to 364) used when requesting data from the Google Analytics API. The bigger this value is, the faster the sync will be, but the more likely that sampling will be applied to your data, potentially causing inaccuracies in the returned results. We recommend setting this to 1 unless you have a hard requirement to make the sync faster at the expense of accuracy. This field does not apply to custom Cohort reports. See the Data Sampling section below for more context on this field.
Click Save & Test.
Supported streams
This source is capable of syncing the following streams:
- daily_active_users
- devices
- four_weekly_active_users
- locations
- pages
- traffic_sources
- website_overview
- weekly_active_users
- user_acquisition_first_user_medium_report
- user_acquisition_first_user_source_report
- user_acquisition_first_user_source_medium_report
- user_acquisition_first_user_source_platform_report
- user_acquisition_first_user_campaign_report
- user_acquisition_first_user_google_ads_ad_network_type_report
- user_acquisition_first_user_google_ads_ad_group_name_report
- traffic_acquisition_session_source_medium_report
- traffic_acquisition_session_medium_report
- traffic_acquisition_session_source_report
- traffic_acquisition_session_campaign_report
- traffic_acquisition_session_default_channel_grouping_report
- traffic_acquisition_session_source_platform_report
- events_report
- weekly_events_report
- conversions_report
- pages_title_and_screen_class_report
- pages_path_report
- pages_title_and_screen_name_report
- content_group_report
- ecommerce_purchases_item_name_report
- ecommerce_purchases_item_id_report
- ecommerce_purchases_item_category_report_combined
- ecommerce_purchases_item_category_report
- ecommerce_purchases_item_category_2_report
- ecommerce_purchases_item_category_3_report
- ecommerce_purchases_item_category_4_report
- ecommerce_purchases_item_category_5_report
- ecommerce_purchases_item_brand_report
- publisher_ads_ad_unit_report
- publisher_ads_page_path_report
- publisher_ads_ad_format_report
- publisher_ads_ad_source_report
- demographic_country_report
- demographic_region_report
- demographic_city_report
- demographic_language_report
- demographic_age_report
- demographic_gender_report
- demographic_interest_report
- tech_browser_report
- tech_device_category_report
- tech_device_model_report
- tech_screen_resolution_report
- tech_app_version_report
- tech_platform_report
- tech_platform_device_category_report
- tech_operating_system_report
- tech_os_with_version_report
- Custom stream(s)
Integration-specific features
Custom Reports
Custom reports in GA4 allow for flexibility in querying specific data tailored to your needs. You can define the following components:
- Name: The name of the custom report.
- Dimensions: An array of categories for data, such as city, user type, etc.
- Metrics: An array of quantitative measurements, such as active users, page views, etc.
- CohortSpec: (Optional) An object containing specific cohort analysis settings, such as cohort size and date range. More information on this object can be found in the GA4 documentation.
- Pivots: (Optional) An array of pivot tables for data, such as page views by city, etc. More information on pivots can be found in the GA4 documentation.
A full list of dimensions and metrics supported in the API can be found here. To ensure your dimensions and metrics are compatible for your GA4 property, you can use the GA4 Dimensions & Metrics Explorer.
Custom reports should be constructed as an array of JSON objects in the following format:
[
  {
    "name": "<report-name>",
    "dimensions": ["<dimension-name>", ...],
    "metrics": ["<metric-name>", ...],
    "cohortSpec": {/* cohortSpec object */},
    "pivots": [{/* pivot object */}, ...]
  }
]
The following is an example of a basic User Engagement report to track sessions and bounce rate, segmented by city:
[
  {
    "name": "User Engagement Report",
    "dimensions": ["city"],
    "metrics": ["sessions", "bounceRate"]
  }
]
By specifying a cohort with a 7-day range and pivoting on the city dimension, the report can be further tailored to offer a detailed view of engagement trends within the top 50 cities for the specified date range.
[
  {
    "name": "User Engagement Report",
    "dimensions": ["city"],
    "metrics": ["sessions", "bounceRate"],
    "cohortSpec": {
      "cohorts": [
        {
          "name": "Last 7 Days",
          "dateRange": {
            "startDate": "2023-07-27",
            "endDate": "2023-08-03"
          }
        }
      ],
      "cohortReportSettings": {
        "accumulate": true
      }
    },
    "pivots": [
      {
        "fieldNames": ["city"],
        "limit": 50,
        "metricAggregations": ["TOTAL"]
      }
    ]
  }
]
Data Sampling and Data Request Intervals
Data sampling in GA4 refers to the process of estimating analytics data when the amount of data in an account exceeds Google's predefined compute thresholds. To mitigate the chances of data sampling being applied to the results, the Data Request Interval field allows users to specify the interval used when requesting data from the Google Analytics API.
By setting the interval to 1 day, users can reduce the data processed per request, minimizing the likelihood of data sampling and ensuring more accurate results. While larger time intervals (up to 364 days) can speed up the sync, we recommend choosing a smaller value to prioritize data accuracy unless there is a specific need for faster synchronization at the expense of some potential inaccuracies. Please note that this field does not apply to custom Cohort reports.
Refer to the Google Analytics documentation for more information on data sampling.
Data type mapping
| Integration Type | Daspire Type |
|---|---|
string | string |
number | number |
array | array |
object | object |
Troubleshooting
The Google Analytics integration is subject to Google Analytics Data API quotas. Please refer to Google's documentation for specific breakdowns on these quotas.
Max number of tables that can be synced at a time is 6,000. We advise you to adjust your settings if it fails to fetch schema due to max number of tables reached.